sábado, 26 de diciembre de 2015
Adornos Malulu: ORIGAMI/Simple Origami Christmas Baubles
Adornos Malulu: ORIGAMI/Simple Origami Christmas Baubles: Estas las hice yo basada en el patrón y son muy fáciles de hacer. Simple Origami Christmas Baubles


Adornos Malulu: Dog Paws Christmas Stocking
Adornos Malulu: Dog Paws Christmas Stocking: pa http://thecrochetcrowd.com/dog-paws-christmas-stocking/ Dog Paws Stockings Give your dog something special for Christmas with th...
 At last I made it and it`s look wonderfull
Finalmente lo hice y se ve precioso
At last I made it and it`s look wonderfullFinalmente lo hice y se ve precioso
Dog Paws Christmas Stocking


Dog Paws Stockings
Give your dog something special for Christmas with this adorable Dog Paws Christmas Stocking.
I tried this stocking before and I wasn’t successful because I was getting too distracted around me. This time, I decided to change up the game plan by looking for the pattern to create my own diagram to follow long. With great success, I created my diagram and completed the stocking.
In the tutorial, I refer to this diagram.
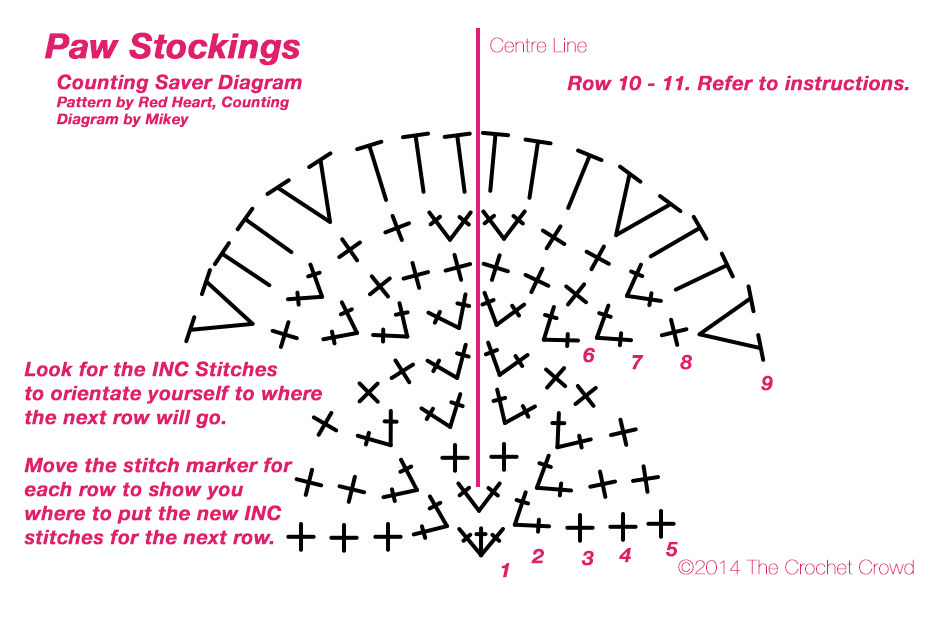
You can print out this diagram to help you if you prefer. By noticing where the increases start on each row, you can avoid all of the extra counting by strategically placing your stitch marker in the right stitch for the next row.
In the video tutorial, as we work along in paw stocking area, I will be showing you where to put the stitch marker as we do each row. Having this diagram will save you a lot of time and grief over potentially miscounting the pattern.
Tutorial also includes the bone to sew on as well.
Get the Free Pattern, it’s called Dog Paws Christmas Stocking.
Video Tutorial (Right and Left)


JuliaCrossland: Chunky Little Crocheted Bowl
JuliaCrossland: Chunky Little Crocheted Bowl: crocheted bowl Hello my friends I'm typing this with the door wide open, as well as the windows ~ there is a wonderfully humid breeze ...


Hello my friends
I'm typing this with the door wide open, as well as the windows ~ there is a wonderfully humid breeze gently blowing and I have a feeling of happiness as I type because it feels like Real Warm Weather is finally arriving!
Today I'm going to give you a little pattern for my crocheted bowl, which is made out ofjust one ball of yarn and you can whip it up in just one evening (or a couple of hours).

The wool I used was Sirdar Sublime Cashmere Merino Silk Aran which I got on sale for just £1.99.
It is a 50g ball which measures approximately 86 mtrs in length.
Take a No.4 hook and sit and chain stitch the whole ball. Yes. The whole ball.
This actually becomes ridiculously therapeutic and I found myself in something of a trance like state once I'd got to the end.
Next, you're going to need a No.10 hook because you're going to be crocheting all those chains into a bowl shape and you're going to need something big to handle the chunkiness of it.
The following pattern is written in US stitch terminology, but Im basically using SC the whole time which is DC for those of you who read UK style.

Round 1: Using the chained yarn as you would ordinary yarn, CH2 and then do 6SC in the second chain from the hook. SS to join (6 stitches)
Round 2: 2SC in each stitch around, SS to join (12 stitches)
Round 3: *1SC in SC stitch followed by 2SC in next SC stitch* repeat this 6 times and SS to join (18 stitches)
Round 4: *2SC, followed by 2SC in next SC stitch* repeat this 6 times and SS to join (24 stitches)
Round 5: *3SC, followed by 2SC in next SC stitch* repeat 6 times and SS to join (30 stitches)
Round 6 - 10: 1SC all around in each stitch (30 stitches) SS to join.
Almost finished!! Of course, you can make your bowl smaller by starting to build up the sides from Round 3 or 4 if you prefer. This size fits nicely in the palm of your hand:

The edging: Tie on a contrasting piece of yarn (I used a spare bit of Rowan Handknit DK in white and a No.4 hook).
SS to start,
1SC and 1DC in next stitch followed by *1SS, 1SC, 1DC* in following stitch, repeat around and SS to join when finished.
Ta~DAhhhHHH!!
Now go and find somewhere eyecatching to sit your new bowl and admire it often. Fill it with Nice Things. Go and make some different sized ones and cluster them together....oh I'm just in LOVE with this little bowl pattern, so easy, so quick, so gratifying!
Whilst I'm rambling about crochet and yarn, I can tell you that I've managed to get into town to stock up on an extra ball of my waistcoat yarn...the end is in sight, I can barely contain myself!!! Prepare yourself for a reveal Very Soon!!
Enjoy the sunshine, sending love
Julia x
Wednesday, 6 April 2011
Chunky Little Crocheted Bowl

crocheted bowl
Hello my friends
I'm typing this with the door wide open, as well as the windows ~ there is a wonderfully humid breeze gently blowing and I have a feeling of happiness as I type because it feels like Real Warm Weather is finally arriving!
Today I'm going to give you a little pattern for my crocheted bowl, which is made out ofjust one ball of yarn and you can whip it up in just one evening (or a couple of hours).

The wool I used was Sirdar Sublime Cashmere Merino Silk Aran which I got on sale for just £1.99.
It is a 50g ball which measures approximately 86 mtrs in length.
Take a No.4 hook and sit and chain stitch the whole ball. Yes. The whole ball.
This actually becomes ridiculously therapeutic and I found myself in something of a trance like state once I'd got to the end.
Next, you're going to need a No.10 hook because you're going to be crocheting all those chains into a bowl shape and you're going to need something big to handle the chunkiness of it.
The following pattern is written in US stitch terminology, but Im basically using SC the whole time which is DC for those of you who read UK style.

Round 1: Using the chained yarn as you would ordinary yarn, CH2 and then do 6SC in the second chain from the hook. SS to join (6 stitches)
Round 2: 2SC in each stitch around, SS to join (12 stitches)
Round 3: *1SC in SC stitch followed by 2SC in next SC stitch* repeat this 6 times and SS to join (18 stitches)
Round 4: *2SC, followed by 2SC in next SC stitch* repeat this 6 times and SS to join (24 stitches)
Round 5: *3SC, followed by 2SC in next SC stitch* repeat 6 times and SS to join (30 stitches)
Round 6 - 10: 1SC all around in each stitch (30 stitches) SS to join.
Almost finished!! Of course, you can make your bowl smaller by starting to build up the sides from Round 3 or 4 if you prefer. This size fits nicely in the palm of your hand:

The edging: Tie on a contrasting piece of yarn (I used a spare bit of Rowan Handknit DK in white and a No.4 hook).
SS to start,
1SC and 1DC in next stitch followed by *1SS, 1SC, 1DC* in following stitch, repeat around and SS to join when finished.
Ta~DAhhhHHH!!
Now go and find somewhere eyecatching to sit your new bowl and admire it often. Fill it with Nice Things. Go and make some different sized ones and cluster them together....oh I'm just in LOVE with this little bowl pattern, so easy, so quick, so gratifying!
Whilst I'm rambling about crochet and yarn, I can tell you that I've managed to get into town to stock up on an extra ball of my waistcoat yarn...the end is in sight, I can barely contain myself!!! Prepare yourself for a reveal Very Soon!!
Enjoy the sunshine, sending love
Julia x
JuliaCrossland: How to Crochet Sea Pennies
JuliaCrossland: How to Crochet Sea Pennies: Hello. Today I'm going to share a short tutorial with you on how to crochet Sea Pennies ! I'm using Rico Creative Cotton and a...

viernes, 25 de diciembre de 2015
Kaleidoscope Art&Gifts: Adelyn Boot Cuffs FREE pattern to coordinate with ...
Kaleidoscope Art&Gifts: Adelyn Boot Cuffs FREE pattern to coordinate with ...: Introducing the Adelyn Boot Cuffs FREE pattern by Kaleidoscope Art&Gifts photo credit to Butterfly Dreams Crochet and Crafts Des...
 Designed to coordinate with the Adelyn Earwarmer (also a free pattern), these understated and stylish boot cuffs offer warmth and an eye pleasing texture that will compliment any cold weather outfit. Work up the earwarmer along with them and you have a unique handmade gift set! The Adelyn collection uses Tss (Tunisian simple stitch) and Ttc (Tunisian treble crochet) which provide just enough texture and interest to please a seasoned Tunisian crocheter but is also simple enough to be the perfect "starter" project for those wanting to learn Tunisian crochet. The FREE pattern below contains tutorial links to get you started.
Designed to coordinate with the Adelyn Earwarmer (also a free pattern), these understated and stylish boot cuffs offer warmth and an eye pleasing texture that will compliment any cold weather outfit. Work up the earwarmer along with them and you have a unique handmade gift set! The Adelyn collection uses Tss (Tunisian simple stitch) and Ttc (Tunisian treble crochet) which provide just enough texture and interest to please a seasoned Tunisian crocheter but is also simple enough to be the perfect "starter" project for those wanting to learn Tunisian crochet. The FREE pattern below contains tutorial links to get you started.
Click HERE to add this pattern to your favorites on Ravelry
Click HERE to Pin it for later
By using this pattern you agree to the Pattern Terms of Use set forth by Kaleidoscope Art&Gifts
This pattern is the intellectual property of Lisa Jelle/Kaleidoscope Art&Gifts. Rewriting, reselling, distributing, or copying this pattern as your own, and/or without my consent is prohibited. If you wish to sell finished items produced from this pattern, feel free to do so. However, I ask that you please credit me as the pattern designer and link back to me as follows:
This pattern is the intellectual property of Lisa Jelle/Kaleidoscope Art&Gifts. Rewriting, reselling, distributing, or copying this pattern as your own, and/or without my consent is prohibited. If you wish to sell finished items produced from this pattern, feel free to do so. However, I ask that you please credit me as the pattern designer and link back to me as follows:
Pattern by Lisa Jelle/Kaleidoscope Art&Gifts
YARN
Red Heart With Love (or comparable #4/worsted weight yarn): approximately 60-80 yards
Red Heart Comfort Sport (or comparable #3/light weight yarn): less than 30 yards
MATERIALS
Size H/8(5mm) Tunisian (or standard) crochet hook, stitch markers, scissors, tapestry/yarn needle, measuring tape
DIFFICULTY
Easy
SIZE(S)
Toddler (5”-6” around & 3”-4” tall), Child (7”-9” around and 4”-5” tall), PreTeen/Adult Sm (10”-12” around & 5”-6” tall) and Adult Med-Adult Lg (13”-17” around and 6”-7” tall)
(**measure actual calf circumference when possible to determine the correct size to work in this pattern)
GAUGE
8 tss sts x 6 rows= 2"x2" square
STITCH GUIDE
ch(s) - chain(s), tss - tunisian simple stitch (http://www.crochetspot.com/how-to-crochet-tunisian-simple-stitch-tss/ ) , ttc - tunisian treble crochet (http://tuncro.blogspot.com/2010/12/tunisian-treble-crochet-ttc.html#.VmHQv3arTIU ) , st(s) - stitch(es), sl st - slip stitch
SPECIAL STITCH
Ttc/tunisian treble crochet- yarn over twice, insert hook (from right to left) into front vertical bar of next st, yarn over and pull loop through st, [yarn over and pull through TWO loops] twice (leaving ONE loop on hook).
NOTES
Pattern is written as Toddler size with instructions for larger sizes in [ ]’s
PATTERN
Ch 11[15, 19, 23]
Row 1: (right side facing) Forward: Pull up loop in 2nd ch from hook and in each ch across. Return: yarn over, pull through ONE loop on hook, *yarn over, pull through TWO loops on hook*, repeat from * - * to end (11sts[15, 19, 23])
Row 2: Forward: Tss in each st across. Return: yarn over, pull through ONE loop on hook, *yarn over, pull through TWO loops on hook*, repeat from * - * to end (11sts[15, 19, 23])
Row 3: Forward: (loop on hook counts as one stitch) *Ttc in next st TWO ROWS BELOW, tss in next st*, repeat from * - * across. Return: yarn over, pull through ONE loop on hook, *yarn over, pull through TWO loops on hook*, repeat from * - * to end (11sts[15, 19, 23])
Row 4: Repeat R2
Row 5: Repeat R3
Repeat R2-R5 til piece measures 5”[7”, 10”, 13”] long
LAST ROW: Repeat R2, do NOT fasten off
FINISHING
With WRONG side facing out, bring short ends together to form a ring, sl st ends together, fasten off and weave in ends.
TRIM
Attach #3 weight trim color yarn with sl st in last st where you fastened off.
Trim Round 1: ch1, sc in same st, work 15[21, 31, 39] more scs evenly around in ends of rows, join w/sl st in 1st st (16sts[22, 32, 40])
Trim Round 2: ch1, sl st in same st, *ch2, sl st in next st*, repeat from * - * around to end, join w/sl st in first st, fasten off and weave in ends (16 loops[22, 32, 40])
Reattach #3 weight trim color yarn on other edge, at seam, and (ch1, sc around, join w/sl st in 1st st). Repeat this step THREE more times, fasten of and weave in ends.
OPTIONAL
Add button(s), flower, other embellishments as you like.
Suscribirse a:
Entradas (Atom)