miércoles, 8 de junio de 2016

Zooty Owl's Crafty Blog: You might like to know: Seaside Winter Blanket C...

Zooty Owl's Crafty Blog: You might like to know: Seaside Winter Blanket C...: You might like to know............ I used the following Elle (Saprotex) colours while designing the blanket (from inner to outer circle on...

Seaside Winter Blanket CAL 2016

You might like to know............

I used the following Elle (Saprotex) colours while designing the blanket (from inner to outer circle on my "colour wheel")


169 Cherry Red (Family Knit DK) (100g)
046 Apricot (Pullskein) (100g)
148 Sunset (Charity) (100g)
222 Lemon White (Family Knit DK) (200g)
061 Soft Lime (Family Knit DK) (100g)
007 Jade (Family Knit DK)
239 Peacock (Family Knit DK)
025 Beige (Family Knit DK) (400g)
058 Saxe Blue (Family Knit DK)

A "colour wheel" will be provided with each tutorial so that you can match your colours should you wish to use the same colours as me.

A photo tutorial will be provided for each of the square patterns and the border.   The final stitch count may vary from square to square.   It is therefore advisable to use a "forgiving" joining method.  I have once again used my VISIBLE JOIN as this provides a flat, even finish regardless of the final stitch count.
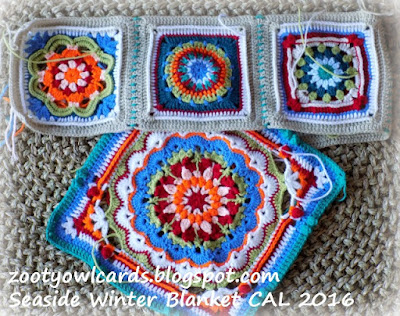
crochet squares


There is a "Print Friendly" button at the top of the right hand side bar -  this enables you to save the document as a PDF file or to remove the images and print an ink-saving hard copy.
  
Where possible I will provide a link to online tutorials for any "special" stitches used throughout the project.

The squares may be inclined to pull a bit skew or pucker slightly due to the fact that I have used a fair amount of overlay / textured crochet.    A bit of gentle tugging to straighten the square is mostly sufficient, but I recently purchased a blocking station to block the squares before joining.   (For the South African crocheters - I bought the blocking station for R200 online from New Kayo Bazaar.)

blocking crochet squares

The squares will each be named for a place along the KwaZulu Natal, South Coast in keeping with the Seaside Winter theme.

I hope that you will be joining me on Friday to crochet our first square.......... the "UMZUMBE"!!!!

Hopeful Honey | Craft, Crochet, Create: How To: Crochet The Block Stitch - Easy Tutorial

Hopeful Honey | Craft, Crochet, Create: How To: Crochet The Block Stitch - Easy Tutorial: The Block Stitch is the perfect stitch for every single crocheter to learn, as it is a fairly easy stitch to learn and creates a colou...

Salitre y papel: Nuevo sonajero amigurumi: Pingüino

Salitre y papel: Nuevo sonajero amigurumi: Pingüino: Aquí estamos otra semana más! En esta ocasión os quiero enseñar uno de mis últimos encargos de la tienda online  que me ha enamorado...

martes, 7 de junio de 2016

YARNFREAK: DIY: Aflangt tæppe i Zpagetti

YARNFREAK: DIY: Oblong carpet in Zpagetti : On such a little half-sad autumn Friday, I think just you need a DIY :) I have many customers in the store, which crocheting the finest ...

Undeniable Glitter: Coral Fringe Triangular Shawl

Undeniable Glitter: Coral Fringe Triangular Shawl: This easy mesh stitch is crocheted into a triangle, to make a lovely shawl. Knotted fringe is then added, to continue with the diamond shape...

martes, 17 de mayo de 2016

martes, 19 de abril de 2016

Skein and Hook: Free Crochet Pattern: Emerson Car Seat Cover

Skein and Hook: Free Crochet Pattern: Emerson Car Seat Cover: I love the concept of car seat covers/canopies.  When you use a regular blanket instead, it is always falling off and you are constantly pi...

Emerson Car Seat Cover

I love the concept of car seat covers/canopies.  When you use a regular blanket instead, it is always falling off and you are constantly picking it up off the ground.  A car seat cover covers and protects your baby for cold weather, rain, snow, bright sun, you name it and it hooks on the handle bar so it ALWAYS stays in place!  I absolutely love it and if you have a baby in an infant seat, you NEED to make one of these to see how great it is.


You can make this in lots of different color combos so it is great for a baby boy or a baby girl.  You can even do it solid if you would like.


Materials needed:
• U.S. J/10-6.0 MM crochet hook
• 2 skeins of Vanna’s Choice in Beige and 1 skein each of Loops & Threads Impeccable in Popsicle Blue, Vanna’s Choice in Raspberry, Pink, and Lime
• Tapestry needle for sewing in the ends
• 2 1-inch buttons
• Needle and thread to coordinate with the straps

Gauge:
• 7 dc= 2 inches

Abbreviations:
• ch= chain
• sc= single crochet
• hdc= half double crochet
• dc= double crochet
• tr= treble crochet
• dc2tog= yarn over, insert hook into the stitch indicated, yarn over and pull through the stitch, yarn over and pull through the first 2 loops on your hook, yarn over, insert hook into the next stitch, yarn over and pull through the stitch, yarn over and pull through the first 2 loops on your hook, yarn over and pull though the remaining 3 loops on your hook
• sc2tog= insert hook into stitch, yarn over and pull through the stitch, insert hook into next stitch, yarn over and pull through the stitch, yarn over, pull through all 3 loops on your hook
• sc3tog= insert hook into stitch, yarn over and pull through the stitch, insert hook into next stitch, yarn over and pull through the stitch, insert hook into next stitch, yarn over and pull through the stitch, yarn over, pull through all 4 loops on your hook
• sl st= slip stitch

Finished size:
• 27” x 36”


Stripe Color Schematic

Row
Color
Ch, 1-2
Popsicle Blue
3
Raspberry
4-5
Beige
6-9
Pink
10-11
Raspberry
12-13
Lime
14
Popsicle Blue
15-18
Beige
19-20
Raspberry
21
Lime
22-23
Pink
24-25
Popsicle Blue
26-27
Pink
28
Raspberry
29-30
Beige
31-34
Lime
35-36
Raspberry
37-38
Popsicle Blue
39
Beige
40-41
Pink
42-43
Raspberry
44
Lime
45-48
Beige
49-50
Pink
51
Lime
52-53
Popsicle Blue
54-55
Raspberry


For the main body of the blanket:
Ch 73.

1:  Dc in 4th chain from hook, *dc in the next 4 stitches, dc2tog, dc2tog, dc in next 4, 2dc in next, 2 dc in next.  Repeat from * across (ending with 2 dc in the last stitch).

2:  Ch 3, turn, dc in the first stitch, *dc in the next 4 stitches, dc2tog, dc2tog, dc in next 4, 2dc in next, 2 dc in next.  Repeat from * across (ending with 2 dc in the last stitch).

Repeat row 2 until the blanket measures 32 inches.  Follow the color schematic chart in above and change colors as specified in the chart (or make up your own pattern).

Border:
1:  With Beige, ch 1, turn, sc in 1st stitch and next stitch, *3 hdc, 4 dc, 3 hdc, 4 sc.  Repeat from * across, ending with 1 sc in 2nd to last stitch and 3sc in last stitch. Continue along long side of blanket and work 80 evenly spaced sc along this edge.  Continue working along the 2nd short side of the blanket, in the first stitch make (sc, tr, dc), then dc in the next 2 stitches, 3 hdc, 4 sc, *3 hdc, 4 dc, 3 hdc, 4 sc.  Repeat from * across, ending with (sc, tr, dc) in the last stitch.  Continue along the other long side of blanket and work 80 evenly spaced sc along this edge, make 3 sc in the beginning ch 1 of this round and join to the 1st sc with sl st.

2: Join Raspberry, ch 1, dc in the same stitch and in each around, making 3 dc in each of the corner stitches, join to 1st dc with sl st.

3: Join Pink, ch 1, dc in the same stitch and in each around, making 3 dc in each of the corner stitches, join to 1st dc with sl st.

4: Join Beige, ch 1, dc in the same stitch and in each around, making 3 dc in each of the corner stitches, join to 1st dc with sl st.

5: Join Popsicle Blue with a standing sc, ch 2, sc in the same stitch as join, *skip 1 sc, (sc, ch 2, sc).  Repeat from * around, except at each 3 stitches that make up the corner, (sc, ch 2, sc) in each of them.

Straps:

For my traditional car seat, I made my straps attach at rows 24-25.  You could attach them in a different spot if that works better with your car seat.  To decide the best spot, lay the cover over the whole car seat and hood and mark with stitch markers where you want your straps to go.  I did mine like this with red stitch markers-


Then you are going to cut two pieces of Beige yarn, both 11 yards each.  Start with one of them and make a slip knot, then put it to the under side of the cover and pull it through with you hook by the right stitch marker.  Then put your hook down through the cover and pull up a stitch, you are going to surface crochet 7 stitches total.  See pictures below-


Next you are going to pull the remaining length of yarn through to the front.  Note: keep your hook in the stitch it is in.


Ch 1, turn, sc in each of the 7 surface stitches.


You can take your stitch markers out at any time now. 

Ch 1, turn, sc across.  Continue this until your strap measures 4.5”. 

Then you will make the button hole: Ch 1, turn, sc in next 2 stitches, ch 3, skip next 3 stitches, sc in last 2 stitches.

Ch 1, turn, sc in all across (including the chains from the previous row- 7sc total).

Ch 1, turn, sc2tog, sc in next 3, sc2tog.

Ch 1, turn, sc2tog, sc, sc2tog

Ch 1, turn, sc3tog, bind off weave in ends.  You will then have a strap like in the below picture.


To make the border for the strap, join Popsicle Blue with a standing sc (shown in images directly below) right near the bottom (closest to the cover) of the right side of the strap, then ch 2, and in the same stitch as standing sc, make another sc. 


*Skip a stitch, then (sc, ch 2, sc) in the next.  Repeat from the * around the strap.


Repeat the entire strap directions for the second strap.  Once finished, you will like two straps like this-


Next you will fold the straps over to determine where you want to sew on the buttons.  If you would like, you can do this while the cover is over your car seat to see exactly where the buttons will work best on your straps.  Then sew on your buttons with needle and thread.  Make sure you attach them really well so they don’t fall off.


Now you can attach onto your car seat and enjoy!


Skein and Hook Copyright © 2014

The pattern and photographs contained in this document are the property of Skein and Hook.  This pattern is available for personal use only.  This pattern may be printed for your personal use only.  You may not in any form copy, redistribute, sell, or represent this pattern or photos as your own.  

Please do not copy this post and claim it as your own.  Please do not republish photos from this post and claim them as your own.  


You are welcomed to sell the items that you make from this pattern- please just credit me as the designer with a link to this post.

Mi lista de blogs

Buscar este blog