
sábado, 13 de febrero de 2016
Crochet Treasures: Heart Coin Purse
Crochet Treasures: Heart Coin Purse: Materials: Worsted Weight yarn Crochet Hook Size H (5.00 mm) Needle Sewing Thread Zipper (6 inches) Abbreviations/...


jueves, 11 de febrero de 2016
little woollie: Big Heart Blanket #2
little woollie: Big Heart Blanket #2: Hello everyone! It feels like ages since I've shown what I've been crocheting, probably because I've been working on a...
Just be happy!: Garter Stitch Coffee Sleeve - Free Crochet Pattern...
Just be happy!: Garter Stitch Coffee Sleeve - Free Crochet Pattern...: Supplies: - Worsted Weight Yarn (I used cotton) - Crochet Hook US Size G6/4.00mm - Scissors - Yarn Needle Instructions: Chain 32, s...
 Supplies:
- Worsted Weight Yarn (I used cotton)
- Crochet Hook US Size G6/4.00mm
- Scissors
- Yarn Needle
Instructions:
Chain 32, slip stitch onto the first chain made to form a ring. Make sure it fits around your coffee cup.


Garter Stitch Coffee Sleeve - Free Crochet Pattern

- Worsted Weight Yarn (I used cotton)
- Crochet Hook US Size G6/4.00mm
- Scissors
- Yarn Needle
Instructions:
Chain 32, slip stitch onto the first chain made to form a ring. Make sure it fits around your coffee cup.

Slip stitch on each stitch around working on the back loops only throughout the whole project (do NOT join) until your coffee sleeve measures about 2.5 inches.

With your yarn needle, weave in loose ends.
This is what the "right side" of your project looks like, but when you turn it inside out, it looks like a knitted garter stitch (first picture of this post). Awesome, right?!

Happy Crocheting!
miércoles, 10 de febrero de 2016
Experiments in Crochet: Converse Slippers Pattern
Experiments in Crochet: Converse Slippers Pattern: I made these slippers for my roommate last year. She loves them! Someone requested I share the pattern, so here it is! A couple of ...

Converse Slippers Pattern

I made these slippers for my roommate last year. She loves them! Someone requested I share the pattern, so here it is!
A couple of things first: These are INDOOR SLIPPERS ONLY. They aren't suitable for going outside, and from what I've seen the white yarn won't clean up completely unless you bleach it, which will ruin the yarn. So only wear them inside, k?
Also, I haven't got around to sizing yet, so these are size 8 women's. If you adapt it to make a different size, I'd love to know! =)
How to read my patterns:
xst y: x is the number of stitches to work into the next stitch. st is the kind of stitch to use. y is the number of stitches to work this way. (2sc 3 means make 2 sc in each of the next 3 stitches.)
sk - skip this many stitches.
2-x (dec): 2sc first st, 1sc x. If there's a dec after this instruction, replace the 2sc with sc2tog.
MATERIALS:
I Love This Yarn! Red (or any color you want) - 1 skein per pair
I Love This Yarn! White - 1 skein per pair
G hook
Yarn needle for sewing in ends
With white, ch23.
1: sc 11, hdc 10, 9hdc, hdc 10, sc 10, 4sc. (54)
2: hdc 21, 2hdc, hdc 2, 2hdc 3, hdc 2, 2hdc, hdc 21, 2hdc 3. (62)
3: hdc 23, 3hdc, hdc 2, 2hdc, hdc 1, 2hdc 2, hdc 1, 2hdc, hdc 2, 2hdc, hdc 23, 2hdc, hdc 2, 2hdc. (70)
4: hdc 26, (2hdc, hdc1)x6, 2hdc, hdc 27, 2hdc 3, hdc 1. (80)
5: hdc 30, 2hdc, hdc 3, 2hdc, hdc 1, 2hdc, hdc 1, 2hdc, hdc 3, 2hdc, hdc 30, 2hdc, hdc 2, 2hdc, hdc 2, 2hdc. (88)
6: hdc 33, 2hdc, hdc 1, (2hdc, hdc 2)x3, 2hdc, hdc 1, 2hdc, hdc 33, 2hdc, hdc 1, 2hdc 4, hdc 1, 2hdc. (100)
7: hdc ea
8: back loops only, sc ea
9-10: sc ea
After row 10, join red between 9 and 10. sl st around. Mark out 28 st at toe. Join red next to the mark.
11: sc to other marker, leaving toe alone. (72)
12: ch3, sk 2, sc to last 2, ch2sk1, sc last.
13: (sc3, sc2tog)x3, sc to last 15, (sc2tog, sc 3)x3
14: sc2tog, sc to last 2, sc2tog.
15: ch3, sk2, sc to last 2, ch2sk1, sc last.
16: (sc3, sc2tog)x3, sc to last 15, (sc2tog, sc3)x3
17: sc2tog, sc to last 2, sc2tog
18: ch3, sk2, sc to last 2, ch2sk1, sc last.
19: (sc2, sc2tog)x4, sc to last 16, (sc2tog, sc 2)x4
20: sc2tog, sc to last 2, sc2tog
21: ch3, sk2, sc to last 2, ch2sk1, sc last.
22: sc2tog, sc to last 2, sc2tog.
23: sc ea
24: ch3, sk2, sc to last 2, ch2sk1, sc last.
25: sc ea. (33)
26: sc ea.
27: ch3, sk2, sc to last 2, ch2sk1, sc last.
28: sc ea. fasten off.
TOE AND TONGUE -- join white in the same sp as the first st of red.
1: back loops only, sc ea. (30)
2: sc2tog ea (15)
3: 2-1 dec. (10)
4: sc 3, sc2tog 2, sc 3 (8)
5: sc 3, sc2tog, sc 3 (7)
6: sc, sc2tog, sc, sc2tog, sc (5)
7: sc2tog, sk 1, sc2tog. fasten off. break white.
8: Join red at 1 side. sc across. (16)
9: sc2tog, dc to last 2, dc2tog. (14)
10: dc ea
10 11 12 13 14 15
16: dc2tog, dc to last 2, dc2tog (12)
17: dc ea
17 18 19 20 21
22: dc2tog, dc to last 2, dc2tog (10)
23: dc ea
23 24. Fasten off.
FINISHING.
Join red at the top of the high-top, just behind the first lace hole. sc down one side, across the edge of the toe (where the white toe meets the red tongue) and up the other side. Fasten off.
Sew in all ends.
LACES: With white, ch235.
And there you are! Make the other one and you're good to go!
martes, 9 de febrero de 2016
Huisje Blij van Zin: Het licht gezien
Huisje Blij van Zin: Het licht gezien: Met de granny's die ik de laatste keer liet zien ben ik nog lekker bezig. Tussendoor alweer wat andere dingetjes gehaakt. Want die nieu...
lunes, 8 de febrero de 2016
Praying With My Feet: Crocheted Scalloped Border Tutorial
Praying With My Feet: Crocheted Scalloped Border Tutorial: How to crochet an easy scalloped border 1. Start where you are *or* slip stitch, then single crochet into same space. Double cr...


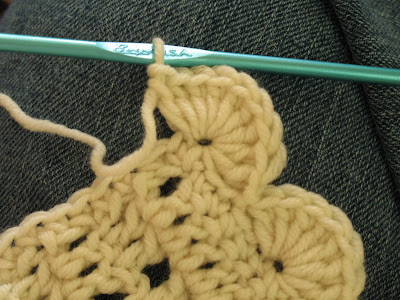


Scalloped Border Tutorial
How to crochet an easy scalloped border
1. Start where you are *or* slip stitch, then single crochet into same space.

Double crochet into second stitch from hook (call this stitch "home").

It should look like this:

Make six more double crochet stitches into "home".

After number seven, it should look like this:

Slip stitch into third stitch* from "home"...

...after which it should look like this (back where you started):

This gives you a very flat, even row of scallops.

To turn the corner: begin your scallop 2-3 stitches before the corner.
(Yes, I know this takes a little planning or finagling.)
Start it just like a regular scallop, using the corner stitch as "home".
A total of twelve double crochets will be made into "home".

Slip stitch into the third stitch around the corner from "home".

And there's your corner!

*Yes, I know that to be perfectly symmetrical you would slip stitch into thesecond stitch from home, but for some reason the scallops do not come out perfectly flat this way. Trust me. (Or try it yourself.)
This is my most popular post by a very huge margin! Well over 15,00023,000 69,000 84,000 92,000 115,000 views to date. Hello to everyone who has visited from Pinterest! (c: I'm so glad this has been helpful to so many and it has been a treat to see all the projects that have used it. Take a moment to look around, check out my other projects. Great to have you!
The Royal Sisters: Chevron Granny Blanket Pattern
The Royal Sisters: Chevron Granny Blanket Pattern: Thank you to all the lovelies who have e-mailed me and received this pattern as a pdf... I have now worked out how to upload this to flickr...

Chevron Granny Blanket Pattern
Thank you to all the lovelies who have e-mailed me
and received this pattern as a pdf...
I have now worked out how to upload this to flickr
so everyone can enjoy and print off there own
without the worry of e-mailing me...
Not that e-mailing me is a worry...
But you know what I mean...
So please click on the picture below
and it will send you off to flickr where you can click on all sizes
and have a copy to keep...
P.S...classes were wonderful last night
with many of my ladies finishing there very own Nana Square...
We are starting the Granny Square next week...
and the all worrying changing colours as you go...
I am sure they will all be fine at it thou...
Suscribirse a:
Entradas (Atom)